I. Introduction
Marigolds are perhaps one of the most popular and desirable flowers to grow from seeds. With their vibrant colors and cheerful blooms, marigolds add a touch of beauty to gardens, patios, and even window boxes. If you are eager to start your own marigold garden, this article will provide you with a step-by-step guide on starting marigold seeds successfully. Whether you are a beginner or an experienced gardener, you will find valuable tips and tricks to ensure a bountiful and blooming marigold garden.
II. “A Step-by-Step Guide on Starting Marigold Seeds Successfully”
When it comes to starting marigold seeds, choosing the right seeds is crucial. Opt for fresh marigold seeds from a reputable supplier or, if you have marigolds growing in your garden, consider collecting and saving the seeds from your own flowers. This ensures the quality and viability of the seeds.
Step 1: Gather necessary materials
Before you begin planting marigold seeds, gather all the necessary materials. You will need high-quality potting soil, containers or seed trays, a small shovel or trowel, a watering can or spray bottle, and clear plastic covers or plastic wrap to create a greenhouse-like environment.
Step 2: Preparing the soil and container
Marigolds prefer well-draining soil, so prepare the soil mixture by combining potting soil with equal parts of perlite or vermiculite. Fill the containers or seed trays with the prepared soil, leaving around an inch of space at the top.
Step 3: Planting the seeds correctly
Plant the marigold seeds about half an inch deep into the soil. Space the seeds properly to allow room for growth. Cover the seeds gently with a thin layer of soil, ensuring that they are well-covered but not buried too deep.
Step 4: Watering and providing adequate sunlight
After planting the marigold seeds, water them gently using a watering can or spray bottle. Be careful not to drown the seeds. Place the containers in a sunny location or if you are using seed trays, place them under grow lights or near a sunny window to provide adequate sunlight for germination.
Step 5: Transplanting or thinning out seedlings
As the marigold seedlings sprout and grow, you may need to thin them out or transplant them into individual pots to allow proper growth and development. When the seedlings have grown their first set of true leaves, carefully remove the weaker ones, leaving behind the strongest seedlings.
III. “Planting Marigold Seeds: A Beginner’s Guide to Gardening”
Starting marigold seeds from scratch can be a rewarding experience for beginner gardeners. Not only do you have control over the entire process, but you also get to witness the transformation from seed to vibrant blooms.
Marigolds can be started indoors several weeks before the last frost date or propagated directly outdoors once all chance of frost has passed. To determine the best time to plant marigold seeds in your area, refer to your local frost dates or gardening calendar.
Choosing the right location for planting
Marigolds thrive in full sun exposure, so choose a location in your garden or on your patio that receives at least six hours of direct sunlight per day. Ensure that the soil is well-draining to prevent waterlogged conditions, which can lead to root rot.
Different methods of planting marigold seeds
When planting marigold seeds, you have several options. You can either sow the seeds directly into the ground, start them indoors and later transplant them, or use biodegradable peat pots that can be planted directly into the soil.
Provide tips for caring for young marigold plants
Once your marigold seeds have germinated and sprouted into young plants, proper care is essential for their healthy growth. Regularly water the plants, keeping the soil moist but not waterlogged. Avoid wetting the foliage as this can promote fungal diseases. Apply a balanced liquid fertilizer every two weeks to provide essential nutrients.
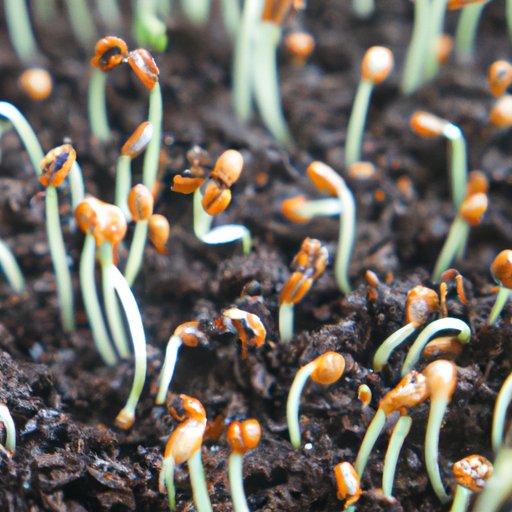
IV. “Unlocking the Secrets: Tips and Tricks to Germinate Marigold Seeds”
While marigold seeds are generally easy to grow, understanding the germination process and overcoming common challenges can increase the success rate.
Explanation of germination process and common challenges
Marigold seeds germinate best when the soil temperatures are consistently warm. The typical germination period for marigolds is around 7 to 14 days, although it may take longer depending on the variety and environmental conditions.
Tips for enhancing germination success
To enhance germination success, soak the marigold seeds in warm water overnight before planting. This softens the hard outer seed coat and promotes faster germination. Another technique is stratification, which involves exposing the seeds to cold temperatures for a specific period to break their dormancy and encourage germination.
Discuss the benefits of pre-soaking marigold seeds
Pre-soaking marigold seeds not only hastens germination but also allows you to identify and discard any seeds that do not sink. This ensures that you are only planting viable and healthy seeds, resulting in a higher germination rate.
Provide tips for creating an ideal germination environment
Creating an ideal germination environment is crucial for successful germination of marigold seeds. Keep the soil consistently damp, but not saturated, by misting or watering lightly. Cover the containers or trays with clear plastic covers or plastic wrap to create a greenhouse-like atmosphere that aids germination.
V. “From Seed to Blooms: How to Kickstart Marigold Seed Germination”
Understanding the journey from seed to blooms is important to ensure successful germination and healthy growth of your marigold plants.
Discuss the expected timeline for germination
After planting marigold seeds, germination typically occurs within 7 to 14 days. However, it is important to note that the germination timeline can vary depending on various factors, such as temperature, soil conditions, and the specific marigold variety.
Important factors that affect seed germination
Several factors can affect marigold seed germination. Adequate warmth, moisture, and sunlight are key elements for successful germination. Additionally, the quality and viability of the seeds, as well as the presence of any pests or diseases, can impact the germination rate and overall success.
How to identify and address common issues during germination
During the germination process, it is important to stay vigilant and identify any issues that may arise. Common issues include damping off, a fungal disease that causes seedlings to collapse, and deficiencies or imbalances in essential nutrients. Proper sanitation, good airflow, and regular monitoring can help prevent and address such issues.
Tips for promoting healthy growth and development of seedlings
To promote healthy growth of your marigold seedlings, ensure they receive sufficient sunlight, water, and nutrients. Gradually harden off the seedlings by exposing them to outdoor conditions before transplanting them into the garden. Prune off any leggy growth or dead leaves to encourage bushier growth.
VI. “Sowing Sunshine: Mastering the Art of Growing Marigolds from Seeds”
Marigolds are not only beautiful and versatile flowers; they also offer numerous benefits for your garden. Understanding the best practices for nurturing marigold plants will ensure your garden is filled with an abundance of vibrant blooms.
Discuss the beauty and versatility of marigold flowers
Marigold flowers come in various shades of yellow, orange, and red, adding a natural warmth and radiance to any garden. They are versatile in their uses, serving as excellent bedding plants, container plants, or border flowers. Additionally, marigolds have a natural ability to repel certain pests, making them a valuable addition to any organic garden.
Best practices for nurturing marigold plants
When nurturing marigold plants, it is important to provide them with proper care. Water them regularly, aiming for consistent soil moisture. Fertilize every two to three weeks with a balanced fertilizer. Pinch back young plants to encourage bushier growth and remove spent blooms to promote continuous flowering.
Provide tips on pest and disease management
Marigolds are generally resistant to most pests and diseases. However, occasional issues such as aphids, spider mites, or fungal diseases may arise. Remove any affected leaves or plants promptly and consider using natural pest control methods, such as companion planting or homemade organic sprays.
Explain the process of deadheading and harvesting marigold blooms
To encourage prolonged blooming, deadhead marigold flowers regularly. Deadheading is the process of removing spent blooms to prevent the plant from directing energy towards seed production. Additionally, you can harvest marigold blooms to dry and use in various crafts, such as potpourri or homemade beauty products.
VII. Conclusion
In conclusion, starting marigold seeds is a rewarding and enjoyable experience that allows you to witness the transformation from tiny seeds to vibrant blooms. By following the step-by-step guide provided in this article, you can ensure successful germination and growth of your marigold plants. The beauty, versatility, and numerous benefits of marigolds make them a wonderful addition to any garden.
(Note: Is this article not meeting your expectations? Do you have knowledge or insights to share? Unlock new opportunities and expand your reach by joining our authors team. Click Registration to join us and share your expertise with our readers.)