Introduction
Boondoggle, also known as gimp or boondoggle stitch, is a type of craft that involves weaving strands of plastic or fabric to create intricate designs. This fun and creative hobby has been around for decades and continues to be popular among both children and adults. In this article, we’ll explore the basics of starting boondoggle, including tips and techniques for beginners, different types of stitches and materials, project ideas and more.
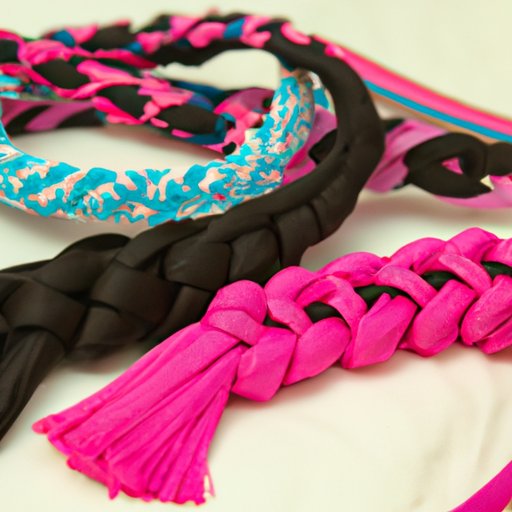
Beginner’s Guide to Boondoggle: Tips and Techniques for Starting Your First Project
If you’re new to boondoggling, the first step is to gather the necessary materials. This includes cord or string, scissors, and a clipboard or lacing board to hold the project in place. You can also purchase special plastic lacing or craft lace for weaving.
The basic technique for boondoggling involves weaving strands of cord in a series of loops or knots, creating a braided effect. To start your first project, choose a simple design such as a basic lanyard or keychain. Cut two strands of your chosen cord to equal lengths and tie an overhand knot at one end. Then, secure the knot onto your clipboard and start weaving.
Here are a few tips for success:
- Be patient: Boondoggling requires a bit of practice to get the hang of the technique. Don’t be discouraged if your first few attempts don’t turn out perfectly.
- Keep it tight: Make sure to pull the strands tightly as you weave to create a neat and tidy finished product.
- Experiment with different stitches: Once you’ve created a basic design, try adding in new stitches or knots to add variety and texture to your project.
Boondoggle 101: Learning the Basics for Successful Crafting
When it comes to boondoggling, there are several different types of stitches and techniques you can use to create unique designs. Some of the most common stitches include:
- Square stitch: This stitch involves weaving the strands over and under in a square pattern, creating a boxy design.
- Round stitch: For this stitch, you’ll weave the strands in a circular pattern to create a round shape.
- Butterfly stitch: This stitch creates a looped pattern that resembles a butterfly’s wings.
Along with different stitches, there are also a variety of materials and tools you can use in boondoggling. Plastic lacing is a popular choice because it’s inexpensive and easy to work with. However, you can also use fabric strips, leather cord or even paracord for a more unique look.
When it comes to tools, a clipboard or lacing board is essential for keeping your project steady as you weave. You may also want to invest in a pair of specialized scissors designed for cutting lacing or cord, as regular craft scissors can become dull quickly.
To create successful boondoggle designs, here are a few tips and techniques:
- Take breaks: Because boondoggling requires a lot of repetitive movements, it’s important to take breaks to avoid repetitive strain injuries.
- Pay attention to the tension: Consistent tension is key for creating neat and stable designs. Focus on keeping the strands pulled tight as you weave.
- Get creative: Don’t be afraid to experiment with different materials, stitches, and designs to create unique and original projects.
From Lanyards to Keychains – How to Get Started with Boondoggle
Now that you know the basics of boondoggling, it’s time to create your first project! A simple starting point is to create a basic shape such as a lanyard or keychain.
Here’s how to create a basic lanyard:
- Cut two strands of cord to equal lengths and tie an overhand knot at one end.
- Secure the knot onto your clipboard or lacing board.
- Start weaving the cords together using a square stitch or any other stitch you prefer.
- Continue weaving until your lanyard reaches the desired length.
- Tie off the end with another knot and trim any excess cord.
- Add a keyring or clip to the end to finish off your project!
As you become more comfortable with the basic techniques, try experimenting with different materials such as leather or paracord, or incorporating new stitches and patterns to create even more intricate designs.
Crafting Fun for All Ages: A Guide to Starting Boondoggle with Kids
Boondoggling is a great craft for kids because it’s easy to learn and requires minimal materials. The basic techniques are also a great way to develop fine motor skills and hand-eye coordination in younger children.
To get started with boondoggle with kids, here are a few tips and ideas:
- Choose age-appropriate projects: For younger children, stick to basic projects such as bookmarks or bracelets. Older kids can tackle more complex designs such as keychains or lanyards.
- Simplify the technique: To make it easier for kids to learn, stick with a simple stitch such as the square or round stitch, and encourage them to experiment with different color combinations.
- Make it a group activity: Boondoggling is a fun way to engage children in group activities. Consider hosting a boondoggle party or crafting event for your child’s friends or classmates.
The Art of Boondoggle: Starting and Creating Your Own Custom Designs
As you become more comfortable with boondoggling, you may want to experiment with more complex designs and techniques. One of the best things about boondoggling is that it allows for a wide range of creative expression and customization.
Here are a few tips for creating custom boondoggle designs:
- Begin with a plan: Sketch out your design on paper before starting your project. This will help you visualize the finished product and ensure that you have all the necessary materials.
- Experiment with color: Try using different colored cords or lacing to create colorful and unique designs.
- Play with texture: Incorporate different stitches or materials such as fabric strips or beads to add texture and interest to your project.
As you become more confident in your boondoggling skills, you can start exploring more advanced techniques such as knotting or braiding to create even more intricate designs.
Crafting from Home: How to Start Boondoggling and Make Unique Items for Your Loved Ones
Boondoggling is a fun and rewarding hobby that you can easily do from the comfort of your own home. With just a few basic materials and some creative inspiration, you can create unique and personalized gifts for your loved ones.
To get started with home boondoggling, you’ll need a few key tools:
- Cording or lacing in your preferred material
- A clipboard or lacing board
- Specialized scissors or cutting tool
- Optional: beads, charms or other embellishments for added decoration
Here’s a simple project to get you started:
- Cut two strands of cord to equal lengths and tie an overhand knot at one end.
- Secure the knot onto your clipboard or lacing board.
- Create your desired design using your preferred stitch and materials.
- Add any embellishments or decorations as desired.
- Tie off the end with another knot and trim any excess cord.
- Gather or gift your finished boondoggle project to your loved one!
Conclusion
Boondoggling is a fun and rewarding hobby that allows for endless creativity and customization. By following these tips and techniques, you can start creating your own unique projects in no time. Whether you’re crafting for yourself or making gifts for loved ones, boondoggling is a great way to add a personal touch to any project.
So go ahead and give it a try! With a bit of patience and practice, you’ll be a boondoggle pro in no time.
(Note: Is this article not meeting your expectations? Do you have knowledge or insights to share? Unlock new opportunities and expand your reach by joining our authors team. Click Registration to join us and share your expertise with our readers.)