Introduction
If you’re a car enthusiast looking to upgrade your vehicle’s appearance, you may be considering spray painting your car bumper at home. Before you get started, there are important safety precautions to take and tips to ensure your bumper looks professional. This article provides a comprehensive step-by-step guide for beginners to prep, spray, and finish painting a car bumper. We also discuss best practices for color matching, common mistakes to avoid, and the essential tools needed for a successful paint job.
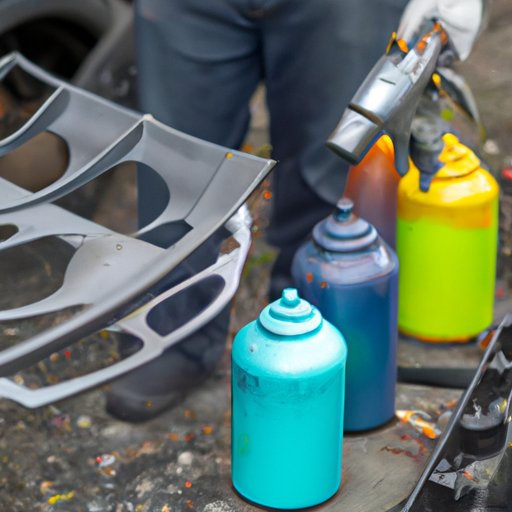
Step-by-Step Guide to Spraying a Car Bumper
Before you begin, make sure you have read through the instruction manual for your paint gun. Reviewing the instructions will ensure the correct use of the tool and enhance its productivity. It is also important to wear protective gear such as a mask, goggles, gloves, and a spray suit before you begin.
Importance of Safety Precautions
Avoiding accidents and injury is a top priority when spray painting, and taking safety precautions is key. Firstly, distinguish a safe and appropriate working environment in your garage or outdoor space. Ensure there is adequate ventilation to allow for the free flow and dispersion of fumes which can be hazardous to one’s health. Secondly, make sure your work area is clear of clutter, excess debris, and rags, which can easily ignite if left near a paint source. In case of an emergency, have a fire extinguisher, and first aid kit nearby.
Necessary Tools and Equipment
One of the necessary tools you will require is a paint gun that you can purchase from an auto body supply store or online. Other tools include a compressor unit, disposable aluminum mixing cups, measuring cups, and sandpaper. You may need to purchase primer, paint, and clear paint formulated explicitly for spray paint use. The primer will help the paint adhere to the bumper. The paint will be the base coat, and the clear coat will add the final shine and protection. Choose the color of paint wisely and research specific brands or manufacturers that will match the color of your vehicle.
Tips for a Successful Outcome:
- Before spraying the actual bumper, take time first to experiment the gun on different test surfaces.
- When spraying on each coat, avoid oversaturation that leads to drips, which produce an uneven surface finish.
- Apply light coats. Applying thick layers of paint requires longer drying time and more sanding in between coats.
- After every coat of primer, sand the bumper with newspaper or sandpaper to provide a smooth, even surface and restore adhesion to the paint and clear coat.
- Stay within the recommended distance of the gun when applying the coats. The different brand specifications may determine how far the spraying nozzle should be from the bumper.
- In between coats, thoroughly clean the gun and container. The paint needs to be completely removed from the nozzle.
DIY Paint Booth
To ensure that your spray bumper paint job goes smoothly with minimal or no dust settling, create a DIY paint booth in your garage. You can also do it outside in a clean area to avoid dust and sunsettling on the drying paint coats.
Importance of Having a Paint Booth in Your Garage
A paint booth creates a draft-free and enclosed space where you can safely work on the car bumper’s surface. The booth provides for an environment that can be strictly regulated for temperature and humidity which promotes good results and efficiency. Additionally, spraying in a paint booth will produce minimal dust accumulation and prevent leaves or bugs from sticking to the paint.
Materials Needed for a DIY Paint Booth
- A fan for venting: blows dust and fumes outside
- plastic sheeting:
- A large painter’s tarp or drop cloth to cover the floor and lock in dust and debris
Step-by-step Instructions for Creating a Paint Booth
- Start by choosing a well-ventilated area or outdoor space that is free of any high humidity levels, which may interfere with the paint’s drying process.
- Clamp four 2×4 pieces of wood into separate pairs at your garage sides to create a square frame. Next, clamp both pairs together to create a square booth.
- To create the roof, slip PVC pipes through the booth at the top and create a canopy with plastic sheeting by taping it across the booth’s top and down to the sides.
- Install a hook or place weights at the bottom of the sheeting to assist in keeping it in place.
- Place the fan to fit over the side of the booth where the gun will be sprayed and reverse it to create a suction effect, which pulls fumes out of the booth.
Tips for Safe and Effective Painting in a Booth
- While spraying, keep the painter’s mask responsive throughout the process to prevent dust inhalation.
- Wipe the bumper surface clean before starting. Ensure that the surface of the bumper is free of dust, grease, and grime.
- Ensure that the temperature levels in the booth are optimal. Optimal warmth inhibits clogging of the sprayer nozzle and promotes drying, minimizing or eliminating paint runs.
Best Practices for Color Matching
The paint color of your bumper should match the color of your car. Ensure that you choose the same brand and make to achieve a seamless color match.
Importance of Proper Color Matching when Painting a Car Bumper
A proper color match will enhance the car’s overall appearance and avoid a jagged or mismatched look.
Tips and Tricks for Achieving a Seamless Finish
- Buy the exact brand and manufacturer color of your car
- Ensure a smooth and even primer coat helps promote color adhesion and promotes transparency.
- For better coverage and match, apply the paint evenly in thin and light coatings and allow the paint to dry before applying the next coating.
- Examine the bumper for color consistencies immediately after each coat is dry.
Techniques for Verifying that the Color Matches the Rest of the Car
Avoid skipping the final clear coat. When completed, the car’s color will entirely match, and the shine will add to its overall appeal.
Common Mistakes to Avoid
There are common mistakes you should avoid while spray painting your car bumper at home, and these can be attributed to lack of proper preparation, lack of essential tools, use of sub-standard equipment, and environmental factors such as humidity and wind.
Tips for Preventing Drips and Controlling Overspray
- Before commencing the work, clean the work area and ensure that it is free of dust and other debris which might settle during the painting process.
- Sand the bumper surface thoroughly between coats and wipe it clean to provide an even surface for the paint to cling.
- Avoid applying a heavy coat as this leads to drips that can make the surface uneven and also leads to product wastage.
Advice for Avoiding Painting When Humidity is Too High
- High humidity levels will negatively affect the drying process, resulting in an uneven surface. A high-temperature spray booth is generally recommended to minimize the humidity level.
- Drying in between coats is vital, and if humidity is high, consider using a dryer or fixer to dry the paint quickly.
Other Common Mistakes to Watch Out For
- Avoid spraying too close to the bumper as this leads to overspray.
- Avoid using substandard products as they may have inferior finishes.
- Avoid painting in high winds since they can lead to debris sticking to the surface, ruining the finish.
Back to Basics
Before you start spray painting your car bumper, it is essential to understand the different types of paint and spray guns, and the basic steps for preparing the surface.
Different Types of Paint and Their Applications
There are three types of car paints: metallic, solid, and pearlescent. Metallic paint typically consists of tiny metal particles that provide a glowing effect throughout the vehicle’s surface. Solid paint contains no metallic color but can be more vibrant and glossy in appearance in various colors. Pearlescent paints consist of tiny sparkle-like particles that reflect the surrounding light.
Overview of Different Types of Spray Guns
There are two primary types of paint spray guns: conventional and HVLP (High Volume Low Pressure). Conventional guns use high pressure to deliver paint. HVLP guns, on the other hand, are designed to use less air than the conventional gun while delivering paint at a high volume.
Basic Steps for Preparing a Bumper for Painting
- Start by thoroughly cleaning the bumper with soap and water, and allow it to dry completely.
- Lightly sand the bumper’s exterior surface with sandpaper to get rid of dings, scratches, and imperfections.
- Thoroughly drying the cleaned bumper by wiping it with a clean, dry rag or microfiber cloth is vital in ensuring that the paint adhesion is strong.
Tools of the Trade
Having the right materials is critical to achieving the best paint job.
Overview of the Different Tools Needed for Spraying a Car Bumper
- A paint compressor
- A paint gun
- A regulator
- A paint stripper
- A starter paint kit
- Plastic sheeting
- Sandpaper
Detailed Explanations of Different Types of Paint Guns
- Conventional Spray Gun:
- HVLP Spray Gun:
- LVLP Spray Gun:
Tips for Choosing the Right Air Compressor and Accessories
- Choose an air compressor that can support the paint sprayer’s air pressure requirement.
- Ensure that you choose the right regulator to maintain steady air pressure throughout the painting process.
- Using an air filter to eliminate the effects of oil mist can result in a superior finishing outcome.
Conclusion
Overall, spraying a car bumper at home requires proper preparation, precautionary measures, and having the right tools to achieve a professional look. Setting up a paint booth and understanding the basics of color matching, avoiding common mistakes, and essential tools for the job, is essential. While the process can be time-consuming, the result is a stunning, unique, and professionally finished product. With practice, patience, and an eye for detail, you can achieve the perfect look for your vehicle.
(Note: Is this article not meeting your expectations? Do you have knowledge or insights to share? Unlock new opportunities and expand your reach by joining our authors team. Click Registration to join us and share your expertise with our readers.)