Introduction
If you’re looking to enhance your car’s appearance, remove rust or scratches, and save some money on professional car painting, then sanding and polishing your car at home may just be the perfect solution for you.
Explanation of the Problem
Over time, your car’s paint job may lose its shine, scratch, get dull, or even rust. This is because of exposure to the sun, rain and the natural elements of the environment which are unavoidable. Sanding your car can eliminate these damages, and polishing can revive the car’s brilliance.
Importance of Sanding Your Car
Sanding is critical for any car painting or repair job. By sanding your car, you can remove rust, scratches, and minor dents and bumps creating a smooth and even surface for a shiny and polished final product.
Brief Overview of the Article Sections
In this article, we will give you a step-by-step guide on how to sand your car at home. We will also discuss the tools needed for the job, common mistakes to avoid when sanding your car, and the benefits of sanding your car at home. We’ll also give you some tips on DIY car sanding, whether you’re a beginner or a pro.
Step-by-Step Guide to Sanding Your Car at Home
Preparing Your Car for Sanding
Before you begin sanding your car, it is essential to prepare the vehicle adequately by washing it thoroughly and removing all dirt, grease, and other contaminants with a degreaser. This ensures you have a clear view of the car’s surface.
Choosing the Right Grits of Sandpaper
The choice of sandpaper grit size depends on the specific task you want to accomplish. Typically, use sandpaper with grits ranging between 120 and 2000, depending on the car’s condition. Coarser grits are suitable for heavier sanding tasks such as removing paint or rust, while finer grits are better for finishing tasks and polishing.
Sanding the Car Body
Start sanding your car with the lowest grit size sandpaper you have. Use a sanding block, moving in circular motions to avoid scratches. Avoid changing the sandpaper grit until you have covered the entire surface of the car. After covering the car’s surface with the lowest grit, use a higher grit sandpaper, e.g., 400, to sand over the surface once again. Make sure you keep the sandpaper wet when sanding. Dry sanding can scratch the surface of the car.
Sanding Hard-to-Reach Areas
It can be challenging to sand tight spaces such as the car’s curves and edges that cannot be reached with a sanding block. To get to these spaces, you can use a small sponge sanding pad that is easy to handle with your hand. Alternatively, a sanding machine can come in handy, especially when dealing with flat surfaces.
Inspecting the Sanded Surface
After sanding, inspect the car surface to see if it is even and smooth. Check carefully, especially in curved areas and other hard-to-reach areas. Look out for sanding marks, areas with incomplete sanding, or scratches on the car surface. Use a flashlight to illuminate the surface if necessary.
Removing Sanding Residue
Once you are satisfied with the sanded surface, clean any residue remaining on the car surface and around the sanding area. A vacuum cleaner can quickly remove dust, while a damp cloth should be used to clean the surface of any dirt or residue with care.
5 Tools You Need to Sand Your Car Like a Pro
Sandpaper
You will need a variety of sandpapers ranging from coarse grit to fine grit. This is to ensure you have sandpapers suitable for all sanding and polishing tasks.
Sanding Block
A sanding block prevents the sandpaper from wrapping around sharp edges and helps to achieve a smooth and even surface. It’s a must-have for any sanding job.
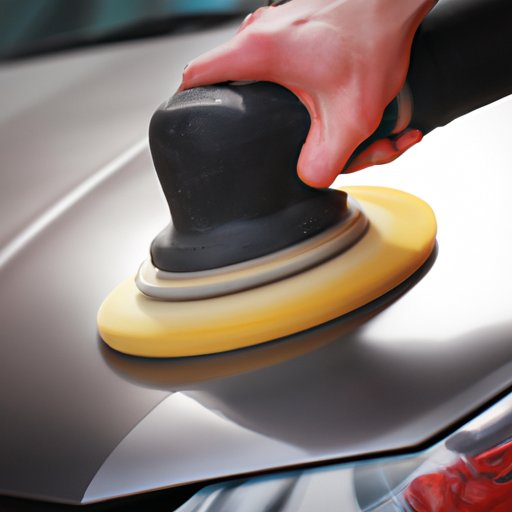
Sanding Machine
A sanding machine comes in handy to tackle large surface areas quickly. It can save you time and help you achieve a more even surface in less time than doing it manually.
Dust Mask
Always wear a dust mask when sanding your car to protect your lungs from inhaling dust and other particles. Breathing in dust continuously can have severe health implications.
Gloves
Wear gloves when sanding your car to protect your hands from potential cuts and scratches that can result from handling the sandpaper.
Common Mistakes to Avoid When Sanding Your Car at Home
Using the Wrong Sandpaper Grit
Not using the right sandpaper grit for the task at hand can cause more harm than good. Too coarse grit will have a blade-like effect, while too fine grit will not remove the imperfections in the car’s surface. Always start with coarser grits and ending with the finer ones for best results.
Pressing too Hard
Pressing too hard on the sandpaper can result in scratches, leading to an uneven surface and leaving your car looking more damaged than it was initially.
Neglecting Safety Precautions
Sanding your car produces dust and debris that can pose a danger to your health if inhaled. Always wear a dust mask and gloves to protect yourself from these potential hazards.
Not Inspecting the Sanded Surface
If you don’t take the time to check the surface for inconsistencies after sanding, you might end up having to redo the whole job. Spotting errors promptly is better than realizing it later on.
Inconsistent Sanding Pattern
Sanding your car unevenly can create an odd-looking pattern on the surface. Consistency when sanding is key.
The Benefits of Sanding and Polishing Your Car at Home
Enhances Car Appearance
A well-sanded and polished car looks better than a car with dull and scratched paint. Polishing the car after sanding gives it a glossy finish, making it look like new.
Removes Rust and Minor Scratches
Sanding is perfect for removing rust and minor scratches on your car’s paint job. This helps to preserve your car’s metal frame and assures it stays in perfect working condition
Saves Money
Sanding and polishing your car at home instead of taking it to a professional can save you a significant amount of money. You can save money on labor costs and get your car looking like new again at a fraction of the cost.
Better Resale Value
A well-maintained car with a shiny appearance will have a higher resale value compared to one with a dull older paint job. Therefore, sanding and polishing your car at home is an excellent investment when thinking of selling your car.
Tips for Maintaining a Pristine Car Paint Job
After sanding and polishing your car, it’s vital to keep up with routine maintenance to ensure the car’s paint job lasts longer. This includes regular washing, using a car cover to protect it from the sun and harsh weather, and avoiding parking in direct sunlight for too long.
DIY Car Sanding for Beginners
Safety Measures to Take Before Sanding
Always wear a dust mask and gloves when sanding your car. Use safety goggles to protect your eyes from dust and flying debris.
Proper Sanding Technique
Use a sanding block for even surface sanding, but for areas that are hard to reach, use a sponge sanding pad. Keep the sandpaper wet to avoid scratches
Myths About Sanding Cars
Sanding your car can be challenging, but it isn’t rocket science. With time and practice, anyone can learn how to do it like a pro. Don’t let others tell you it’s too complicated to do it yourself.
Beginner’s Equipment Checklist
Sandpaper, sanding block, sanding machine, dust mask, and gloves are all the equipment you need to begin sanding your car at home like a pro.
Conclusion
Recap of Key Points
Sanding and polishing your car at home can save you money, enhance your car’s appearance, and remove rust and scratches. Properly preparing the car before sanding, choosing the right sandpaper grit, and inspecting the surface after sanding are essential for a successful job.
Emphasis on the Importance of Sanding Your Car
Sanding your car is not only crucial for its appearance, but it also helps preserve its mechanical parts. It is an excellent investment for car owners who want to maintain their vehicle and save some money while at it.
Encouragement to DIY Car Sanding
Sanding your car may seem a daunting task, but with the right tools, technique, and focus, anyone can do it beautifully. There’s no better way to take care of your car than doing it yourself. It’ll also give you a great sense of accomplishment when you’re done.
(Note: Is this article not meeting your expectations? Do you have knowledge or insights to share? Unlock new opportunities and expand your reach by joining our authors team. Click Registration to join us and share your expertise with our readers.)