Introduction
Making a yeast starter is an important part of the home brewing process. It ensures that your beer has the right amount of alcohol content and enhances the flavor profile and aroma. But what is a yeast starter, and why is it so important? In this article, we will explore the basics of making a yeast starter, as well as provide a step-by-step tutorial on how to make a yeast starter with household ingredients.
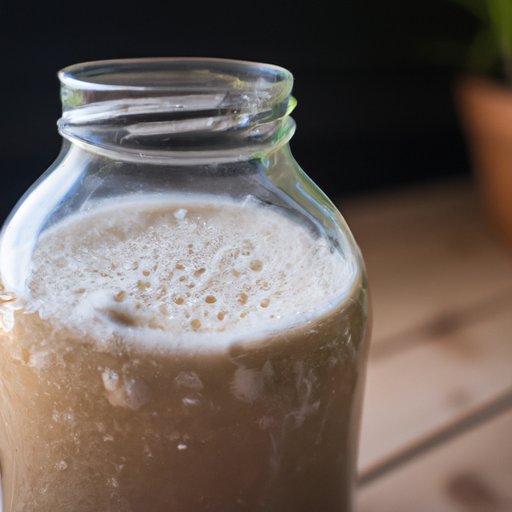
What is a Yeast Starter?
A yeast starter is a small batch of wort (unfermented beer) that is used to inoculate a larger batch of beer. The purpose of the starter is to ensure that the yeast used in the batch of beer are healthy and active before they are added to the main batch. This helps to ensure that the fermentation process goes smoothly and results in a beer that has the desired alcohol content and flavor profile.

Benefits of Making a Yeast Starter
There are many benefits to making a yeast starter. One of the primary benefits is that it increases the alcohol content of the final beer. By increasing the amount of yeast present in the fermentation process, the yeast have more food to consume, resulting in higher levels of alcohol. Additionally, making a yeast starter can also improve the flavor profile of the beer, as well as enhance its aroma. Finally, making a yeast starter allows brewers to better control the fermentation process, ensuring that their beer turns out exactly as expected.
Step-by-Step Tutorial for Making a Yeast Starter
Making a yeast starter is a relatively simple process. Here is a step-by-step tutorial on how to make a yeast starter at home:
Gather Necessary Ingredients
The first step in making a yeast starter is to gather the necessary ingredients. You will need a packet of dry yeast, a tablespoon of sugar, and two cups of water. If you are using liquid yeast, you will need one cup of water and one cup of juice or honey.
Prepare Your Equipment
Next, you will need to prepare your equipment. Make sure that all of your equipment is sanitized and ready to use. You will need a large saucepan, a stirring spoon, and a glass jar or container with a lid.
Activate the Yeast
Once your equipment is ready, it’s time to activate the yeast. Place the dry yeast into the jar and add the sugar and two cups of water. Stir the mixture until the yeast is fully dissolved. If you are using liquid yeast, add one cup of water and one cup of juice or honey. Stir the mixture until the yeast is fully activated.
Monitor and Adjust the Starter
Now that the yeast is activated, it’s time to monitor and adjust the starter. Place the lid on the jar and place the jar in a warm area. Check the starter every few hours and stir it to ensure that the yeast is staying active. If the starter starts to slow down or looks like it is not fermenting, add a teaspoon of sugar and stir until it is fully dissolved.

The Basics of Making a Yeast Starter
Now that you understand the basics of making a yeast starter, let’s explore the different types of yeast and how to prepare the medium.
Types of Yeast
Yeast comes in two forms: dry and liquid. Dry yeast is the most commonly used type of yeast because it is easy to store and does not require any special preparation. Liquid yeast is more expensive but can be used to make a more flavorful beer. When choosing a type of yeast, it is important to consider the type of beer you are making and the flavor profile you are trying to achieve.
Preparing the Medium
When preparing the medium for a yeast starter, it is important to use a high quality wort. Wort is made from malted barley and contains sugars that the yeast can feed on during the fermentation process. You can purchase pre-made wort or make your own using malted barley and water.
Temperature Requirements
In order for the yeast to remain active and productive, it is important to maintain the proper temperature. Generally, the ideal temperature range for a yeast starter is between 70°F and 80°F. Be sure to monitor the temperature of the starter regularly to ensure that it remains within the optimal temperature range.
How to Make a Yeast Starter with Household Ingredients
Making a yeast starter with household ingredients is an easy and cost-effective way to make a starter. Here are three ways to make a starter using common household ingredients:
Using Apple Juice
To make a starter using apple juice, mix one cup of apple juice with one cup of water in a large saucepan. Add the dry yeast and stir until the yeast is fully dissolved. Place the pan over low heat and allow the mixture to simmer for 10 minutes. Once the mixture has reached the desired temperature (70-80°F), transfer it to a glass jar or container and cover with a lid.
Using Orange Juice
To make a starter using orange juice, mix one cup of orange juice with one cup of water in a large saucepan. Add the dry yeast and stir until the yeast is fully dissolved. Place the pan over low heat and allow the mixture to simmer for 10 minutes. Once the mixture has reached the desired temperature (70-80°F), transfer it to a glass jar or container and cover with a lid.
Using Honey
To make a starter using honey, mix one cup of honey with one cup of water in a large saucepan. Add the dry yeast and stir until the yeast is fully dissolved. Place the pan over low heat and allow the mixture to simmer for 10 minutes. Once the mixture has reached the desired temperature (70-80°F), transfer it to a glass jar or container and cover with a lid.

Tips for Making a Perfect Yeast Starter Every Time
Making a perfect yeast starter every time requires some practice and patience. Here are some tips for making a perfect yeast starter every time:
Sanitize All Equipment
It is imperative that all equipment used to make a yeast starter is properly sanitized. Any bacteria or contaminants present in the starter can ruin the entire batch of beer. Be sure to thoroughly clean and sanitize all equipment before use.
Use Fresh Ingredients
Using fresh ingredients is key when making a yeast starter. Old or expired ingredients can contain bacteria or contaminants that can ruin your batch of beer. Be sure to always use fresh ingredients when making a yeast starter.
Monitor the Starter Regularly
It is important to monitor the starter regularly. Check the starter every few hours to ensure that it is fermenting properly. If the starter starts to slow down or doesn’t seem to be fermenting, add a teaspoon of sugar and stir until it is fully dissolved.
A Comprehensive Guide to Making a Yeast Starter
Making a perfect yeast starter requires knowledge and skill. Here is a comprehensive guide to making a perfect yeast starter every time:
Gather Necessary Ingredients
The first step in making a yeast starter is to gather the necessary ingredients. You will need a packet of dry yeast, a tablespoon of sugar, and two cups of water. If you are using liquid yeast, you will need one cup of water and one cup of juice or honey.
Prepare Equipment
Next, you will need to prepare your equipment. Make sure that all of your equipment is sanitized and ready to use. You will need a large saucepan, a stirring spoon, and a glass jar or container with a lid.
Activate the Yeast
Once your equipment is ready, it’s time to activate the yeast. Place the dry yeast into the jar and add the sugar and two cups of water. Stir the mixture until the yeast is fully dissolved. If you are using liquid yeast, add one cup of water and one cup of juice or honey. Stir the mixture until the yeast is fully activated.
Monitor and Adjust the Starter
Now that the yeast is activated, it’s time to monitor and adjust the starter. Place the lid on the jar and place the jar in a warm area. Check the starter every few hours and stir it to ensure that the yeast is staying active. If the starter starts to slow down or looks like it is not fermenting, add a teaspoon of sugar and stir until it is fully dissolved.
Monitor the Temperature
In order for the yeast to remain active and productive, it is important to maintain the proper temperature. Generally, the ideal temperature range for a yeast starter is between 70°F and 80°F. Be sure to monitor the temperature of the starter regularly to ensure that it remains within the optimal temperature range.
Troubleshoot Common Mistakes
It is inevitable that mistakes will be made when making a yeast starter. Be prepared to troubleshoot common mistakes such as incorrect temperatures, contaminated starters, and insufficient oxygenation. With a little practice and patience, you will be able to make a perfect yeast starter every time.
An Overview of the Benefits of Making a Yeast Starter
Making a yeast starter is an important part of the home brewing process. There are many benefits to making a yeast starter, including increased alcohol content, improved flavor profile, and enhanced aroma. Additionally, making a yeast starter is a cost effective way to ensure that your beer turns out exactly as expected.

Troubleshooting Common Mistakes When Making a Yeast Starter
When making a yeast starter, there are a few common mistakes that can occur. These include incorrect temperatures, contaminated starters, and insufficient oxygenation. To avoid these mistakes, make sure to sanitize all equipment, use fresh ingredients, and monitor the starter regularly.
Conclusion
Making a yeast starter is an important part of the home brewing process. It ensures that your beer has the right amount of alcohol content and enhances the flavor profile and aroma. This comprehensive tutorial has provided a step-by-step guide to making a yeast starter, as well as tips for making a perfect starter every time. With a little practice and patience, you too can make a perfect yeast starter every time.
(Note: Is this article not meeting your expectations? Do you have knowledge or insights to share? Unlock new opportunities and expand your reach by joining our authors team. Click Registration to join us and share your expertise with our readers.)