Introduction
Robotics is an exciting field that has gained a lot of popularity in the last few years. Robotics refers to the study of robots and the creation of robots that can perform tasks autonomously or with minimal human intervention. Robots are used in many fields today, including manufacturing, healthcare, education, and entertainment.
Robot cars, in particular, are becoming increasingly popular. They are small robots that are designed to move around and are often used for educational purposes. In this article, we will explore how to make a simple robot car at home and the benefits of doing so.
Importance of Robotics
Robotics has become an important field because of the many benefits it offers. Robots can be used to perform tasks that are dangerous, repetitive, or require high levels of precision. For example, some robots are used in manufacturing to assemble products, such as cars and smartphones, which require precision and consistency.
Robots can also be used in healthcare to perform tasks that are too dangerous or challenging for humans, such as surgeries. In education, robots are used to teach students about different concepts, such as programming, engineering, and physics. Lastly, robots can provide entertainment and create immersive experiences, such as robot-themed amusement parks.
Benefits of Building Your Own Robot Car
Building a robot car can be a fun and educational experience. It can teach you how to build and program robots and can help you develop your problem-solving skills. Additionally, building a robot car can be a great way to teach children about robotics and engineering.
Lastly, building a robot car can be an affordable way to enter the world of robotics. With the right materials and a little bit of time, you can build a functional robot car that can move around and perform simple tasks.
Materials List
Before you start building your robot car, you need to gather all the necessary materials. Here is a list of the materials you will need:
1. Motors
The motors are the most important component of your robot car. They provide the power that moves your car. You will need two motors for your robot car, which can be sourced from online stores or electronic suppliers.
2. Wheels
You will also need two wheels for your robot car. The size of the wheels will depend on the size of your robot car. You can purchase wheels that are specifically designed for robot cars from online stores or electronic suppliers.
3. Battery
The battery provides the power that drives your robot car. You will need a battery that can provide enough power for your motors to run. You can use rechargeable batteries or regular batteries, depending on your preference.
4. Circuit Board
The circuit board is the brain of your robot car. It controls the motors and provides power to the other components of your robot car. You can purchase a pre-made circuit board or make your own.
5. Where to Purchase
You can purchase the materials for your robot car from online stores, electronic suppliers, or even your local hardware store. However, it is important to make sure that the components you purchase are compatible with each other.
Step-by-Step Guide for Building Your Robot Car
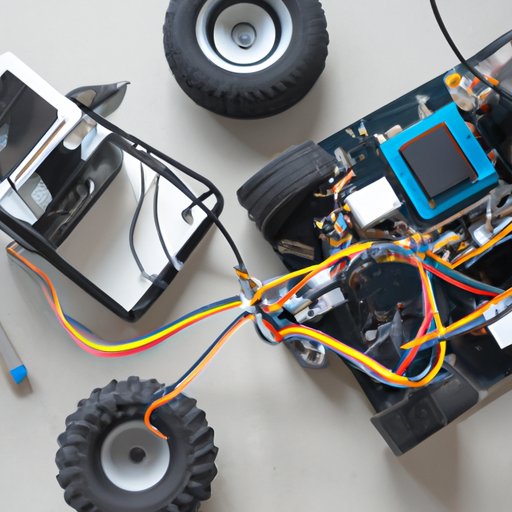
1. Building the Chassis Frame
The first step in building your robot car is to build the chassis frame. The chassis frame is the physical structure of your robot car. You can use materials such as wood or plastic to build the frame. The size of the frame will depend on the size of your robot car.
2. Installing Motors and Wheels
Once you have built the chassis frame, the next step is to install the motors and wheels. You can attach the motors to the chassis frame using screws or bolts. Then, attach the wheels to the motors using couplers or other attachments.
3. Connecting Batteries
The next step is to connect the batteries to your robot car. You can use wires and connectors to connect the batteries to the circuit board and the motors.
4. Mounting and Wiring the Circuit Board
The circuit board controls the motors and provides power to the other components of your robot car. You can mount the circuit board to your chassis frame using screws or adhesive. Then, use wires and connectors to connect the circuit board to the motors and batteries.
5. Testing Your Robot Car
Once you have connected all the components, it is time to test your robot car. Turn on the power and see if your robot car moves. If it does not move, check your connections and make sure everything is connected properly.
Writing Code for Your Robot Car
1. Different Coding Languages Used in Robotics
There are several different programming languages used in robotics, such as C++, Python, and Java. The choice of programming language will depend on your experience and the type of robot you want to build. If you are new to programming, you can start with a simple language like Scratch.
2. Sample Code to Get People Started
Here is a sample code written in Arduino (a popular microcontroller platform) that can help you get started:
void setup() {
  pinMode(5, OUTPUT); // motor A output pins
  pinMode(6, OUTPUT);
  pinMode(10, OUTPUT); // PWM motor A
  pinMode(11, OUTPUT);
  pinMode(9, OUTPUT); // PWM motor B
  pinMode(3, OUTPUT); // motor B output pins
  pinMode(2, OUTPUT);
}

void loop() {
  digitalWrite(6, LOW);
  digitalWrite(11, LOW); // turn both motors off
  digitalWrite(2, HIGH);
  digitalWrite(5, HIGH); // turn left motor forward
  digitalWrite(3, HIGH);
  digitalWrite(9, HIGH); // turn right motor forward
  analogWrite(10, 200); // set left motor speed
  analogWrite(9, 200); // set right motor speed
  delay(2000);
  digitalWrite(6, HIGH);
  digitalWrite(11, HIGH); // turn both motors backward
  digitalWrite(2, LOW);
  digitalWrite(5, LOW); // turn left motor backward
  digitalWrite(3, LOW);
  digitalWrite(9, LOW); // turn right motor backward
  analogWrite(10, 200); // set left motor speed
  analogWrite(9, 200); // set right motor speed
  delay(2000);
}
Different Designs and Features to Consider
1. Adding Sensors
You can add sensors to your robot car to make it more autonomous and intelligent. Sensors can include ultrasonic sensors, infrared sensors, and light sensors. These sensors can be used to detect obstacles, follow lines, or avoid collisions.
2. Making it Remote-Controlled
You can make your robot car remote-controlled by adding a Bluetooth module or a Radio Frequency (RF) module. This will allow you to control your robot car using a remote control or a smartphone.
Troubleshooting Tips
1. Common Mistakes People Make
Common mistakes people make when building a robot car include connecting components incorrectly, not tightening screws properly, and using incompatible components.
2. How to Fix the Problems
If your robot car is not working properly, check the connections between the components, tighten all screws, and make sure that all the components are compatible with each other. If you are still having problems, consult an online forum or seek help from an experienced robotics enthusiast.
Conclusion
Building a robot car can be a fun and educational experience. By following this step-by-step guide, you can build a robot car that can move around and perform simple tasks. Remember to be patient and take your time. Robotics is a field that requires a lot of trial and error. We encourage readers to share their experiences with their newly built robot cars and to continue exploring this exciting field.
(Note: Is this article not meeting your expectations? Do you have knowledge or insights to share? Unlock new opportunities and expand your reach by joining our authors team. Click Registration to join us and share your expertise with our readers.)