Introduction
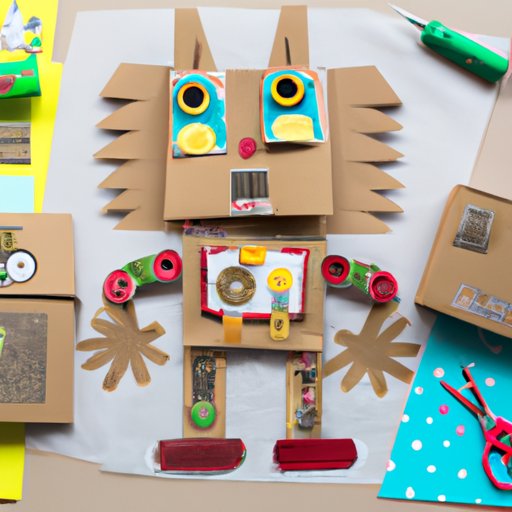
Robots are a fun way to explore technology and engineering. They can also be a great educational tool for children. Building a robot out of cardboard is an accessible and affordable way to get started in robotics. It’s also a great way to have fun with your kids or students.
This article will provide a step-by-step guide to crafting a cardboard robot. We’ll cover everything from gathering materials and cutting out pieces, to assembling the pieces and decorating your robot. We’ll also provide tips for designing a cardboard robot, as well as advice on using electronics and advanced techniques. Finally, we’ll discuss how to make a safe and fun cardboard robot for kids.
Step-by-Step Guide to Crafting a Cardboard Robot
Making a cardboard robot is a great way to explore engineering and creativity. Here is a step-by-step guide to making your own robot:
Step 1: Gather Materials
The first step is to gather all the materials you need to make your robot. You’ll need cardboard, scissors, glue, tape, markers, and any other materials you want to use to decorate your robot. You may also want to consider using electronics such as motors, batteries, and LEDs.
Step 2: Cut Out Pieces
Once you have gathered all the materials, it’s time to start cutting out the pieces for your robot. You can use templates or draw your own designs. If you’re using electronics, make sure to cut out holes for wiring and components.
Step 3: Assemble Pieces
Now that you have all the pieces cut out, it’s time to start assembling them. Start by gluing the pieces together, then reinforce them with tape. Once you have assembled all the pieces, it’s time to start adding electronics.
Step 4: Add Electronics
If you’re using electronics, now is the time to add them. You can use basic components such as LED lights and motors, or more complex components like microcontrollers and sensors. Be sure to read the instructions carefully and make sure all the connections are secure before powering up your robot.
Step 5: Decorate/Paint
Once you have assembled and wired your robot, it’s time to decorate it. Use markers, paints, and other materials to give your robot a unique look. You can also use stickers and other decorations to make your robot stand out.
Designing a Cardboard Robot: A Beginner’s Guide
Designing a cardboard robot can be a challenge. Here are some tips to help you create a unique and functional robot:
Considerations for Design
When designing your robot, think about what functions you want it to have. For example, do you want it to move on its own, or just sit still? Do you want it to be able to sense its environment, or just respond to commands? Thinking through these questions will help you decide which parts and components you need to include in your design.
Making Custom Parts
If you don’t have access to the parts you need, you can always make your own. For example, you can use cardboard to make custom gears, wheels, and other moving parts. You can also use 3D printing to create custom parts for your robot.
Tips for Designing a Cardboard Robot
When designing your robot, there are some things to keep in mind. First, make sure the parts fit together securely. Also, try to keep the weight of the robot balanced so it won’t tip over easily. Finally, consider the size of the parts you need. Smaller parts may be easier to work with, but they may also be more fragile.

How to Create a Robotic Masterpiece from Cardboard
Creating a robotic masterpiece from cardboard is possible if you have the right skills and materials. Here are some tips for taking your robot to the next level:
Advanced Techniques
Once you have mastered the basics, you can start exploring more advanced techniques for creating robots. You can use soldering to create circuit boards, or learn how to program a microcontroller to control your robot. You can also explore 3D printing and laser cutting to create custom parts for your robot.
Using Electronics with Cardboard
Adding electronics to your robot can take it from a static object to a dynamic one. Motors and servos can make your robot move, while sensors can allow it to interact with its environment. You can also add lights and sound effects to make your robot even more lifelike.

Assembling a Cardboard Robot in 5 Easy Steps
Assembling a cardboard robot is not as hard as it may seem. Here is a simple five-step process to help you get started:
Step 1: Gather Materials
The first step is to gather all the materials you need to make your robot. You’ll need cardboard, scissors, glue, tape, markers, and any other materials you want to use to decorate your robot. You may also want to consider using electronics such as motors, batteries, and LEDs.
Step 2: Cut Out Pieces
Once you have gathered all the materials, it’s time to start cutting out the pieces for your robot. You can use templates or draw your own designs. If you’re using electronics, make sure to cut out holes for wiring and components.
Step 3: Assemble Pieces
Now that you have all the pieces cut out, it’s time to start assembling them. Start by gluing the pieces together, then reinforce them with tape. Once you have assembled all the pieces, it’s time to start adding electronics.
Step 4: Add Electronics
If you’re using electronics, now is the time to add them. You can use basic components such as LED lights and motors, or more complex components like microcontrollers and sensors. Be sure to read the instructions carefully and make sure all the connections are secure before powering up your robot.
Step 5: Decorate/Paint
Once you have assembled and wired your robot, it’s time to decorate it. Use markers, paints, and other materials to give your robot a unique look. You can also use stickers and other decorations to make your robot stand out.

Making a Fun Cardboard Robot for Kids
Making a cardboard robot can be a fun project for kids. Here are some tips for making a safe and enjoyable robot for kids:
Choosing Appropriate Materials
When choosing materials for your robot, make sure they are age-appropriate. Avoid using sharp objects such as knives or scissors, and opt for materials such as markers and stickers instead. Also, make sure the robot is light enough for kids to handle safely.
Making the Robot Safe
If you’re using electronics, make sure to use low-voltage components. This will reduce the risk of electric shock. You should also make sure the robot is stable and won’t tip over easily.
Keeping it Simple
When creating a robot for kids, it’s important to keep it simple. Don’t add too many complicated parts or features. Focus on creating a fun and interactive robot that kids can enjoy and learn from.
Building a Cardboard Robot Using Simple Tools and Materials
Building a robot from cardboard doesn’t have to be complicated. Here are some tips for building a robot using simple tools and materials:
Choosing Basic Tools
You don’t need expensive tools to build a cardboard robot. All you need are some basic tools such as scissors, glue, and tape. You can also use markers, paints, and other materials to decorate your robot.
Working With Cardboard
Cardboard is a versatile material that can be used to create just about anything. When working with cardboard, make sure to use heavy-duty cardboard that won’t tear easily. You can also use multiple layers of cardboard to make your robot sturdier.
Finishing Touches
Once you have assembled your robot, it’s time to add the finishing touches. You can use paints and markers to give your robot a unique look, or add lights and sound effects to make it come alive. Have fun and be creative!
Conclusion
Creating a cardboard robot is a great way to explore engineering and creativity. With the right materials and tools, you can make a unique and functional robot. From gathering materials and cutting out pieces, to assembling and decorating, this guide has provided a comprehensive overview of how to make a cardboard robot. We’ve also discussed considerations for design, tips for making custom parts, and how to make a safe and fun cardboard robot for kids. Building a cardboard robot is a rewarding experience that can open up a world of possibilities.
Summary of Key Points
This article has provided a step-by-step guide to making a cardboard robot. We’ve discussed gathering materials, cutting out pieces, assembling and decorating, and adding electronics. We’ve also discussed considerations for design, making custom parts, and making a safe and fun cardboard robot for kids. Finally, we’ve discussed how to build a robot using simple tools and materials.
Further Resources
For more information about building a cardboard robot, check out these resources:
- Instructables: Build Your Own Cardboard Robot
- Make: Build Your Own Cardboard Robot
-
(Note: Is this article not meeting your expectations? Do you have knowledge or insights to share? Unlock new opportunities and expand your reach by joining our authors team. Click Registration to join us and share your expertise with our readers.)