Introduction
A dry well is an effective way of draining excess water from a yard or garden. It’s a simple structure that allows water to be drained away from a property, preventing flooding and other damage. In this article, we’ll look at what a dry well is, the benefits of installing one, the materials needed, and step-by-step instructions for building your own.

Definition of a Dry Well
A dry well is a simple structure that is used to collect and disperse excess water from a property. It is typically composed of a hole that is filled with gravel and lined with a waterproof material such as plastic. A pipe is installed in the bottom of the hole to allow water to flow into the dry well and then be dispersed away from the property. The gravel helps to filter and absorb the water, preventing it from causing damage to the surrounding area.
Benefits of Installing a Dry Well
Installing a dry well can help to prevent water damage to your property. Excess water can cause flooding, erosion, and other problems that can be expensive to repair. A dry well can also help to improve the appearance of your yard or garden by preventing water pooling and creating muddy patches. Finally, a dry well can help to reduce the amount of runoff water that enters storm drains and waterways, which can help to keep them clean and free of debris.
Step-by-Step Guide to Building a Dry Well
Building a dry well is relatively straightforward but should be done with care. Follow these steps to ensure that your dry well is correctly installed:
Locating the Right Spot
The first step to building a dry well is to locate the right spot. Choose an area of your yard or garden that is away from any buildings and slopes away from the house. This will ensure that the water flows away from your property and not towards it.
Preparing the Site
Once you have chosen the location, you need to prepare the site. Clear away any vegetation and level the ground. You may need to use a shovel or rake to do this. It’s important to make sure the area is flat so that the water will flow away from your property.
Digging the Hole
Next, you need to dig the hole for the dry well. The size and depth of the hole will depend on the amount of water you need to drain away and the type of soil in the area. Typically, you should dig the hole two to three feet deep and two to four feet wide.
Lining the Hole
Once the hole has been dug, you need to line it with a waterproof material such as plastic sheeting or a pre-formed liner. This will help to prevent water seeping into the soil and causing damage to your property. Make sure the liner is securely attached to the sides of the hole.
Filling the Hole with Gravel
The next step is to fill the hole with gravel. This will help to filter and absorb the water and prevent it from causing damage to the surrounding area. Use coarse gravel, such as pea gravel, and make sure you fill the hole evenly.
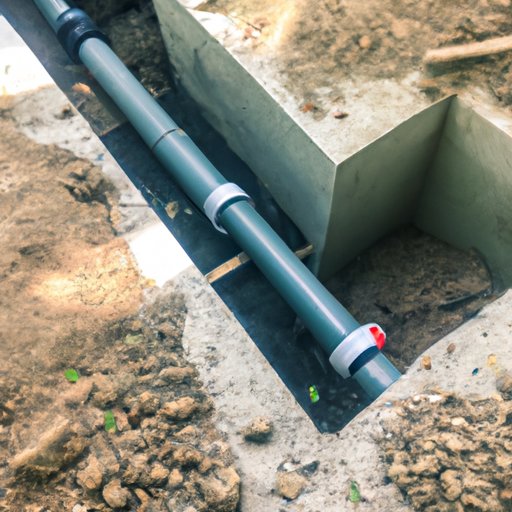
Setting the Pipe System
Once the hole has been filled with gravel, you need to install the pipe system. This will allow water to enter the dry well from other areas of your property. Connect the pipes to the dry well using a flexible connector, making sure to seal any joints with waterproof tape.
Finishing the Installation
Finally, you need to cap the dry well. This can be done with a piece of metal or a heavy stone. Make sure the cap is firmly secured in place so that water doesn’t escape. Once the installation is complete, you can begin to enjoy the benefits of having a dry well.
How to Construct a Dry Well in Your Yard
If you want to construct a dry well in your yard, there are several things you need to consider. Here’s a brief overview of the process:
Choosing the Right Materials
The first step is to choose the right materials for your dry well. You will need a waterproof liner, gravel, and a pipe system. There are several types of liners available, including plastic sheeting, concrete, and pre-formed liners. You also need to choose the right type of gravel; coarse gravel, such as pea gravel, is best for this purpose.
Deciding Where to Place the Dry Well
Once you have the necessary materials, you need to decide where to place the dry well. It should be located in an area of your yard or garden that is away from any buildings and slopes away from your house. This will ensure that the water flows away from your property and not towards it.
Estimating the Size of the Dry Well
You also need to estimate the size of the hole you need to dig for the dry well. This will depend on the amount of water you need to drain away and the type of soil in the area. Generally, you should dig the hole two to three feet deep and two to four feet wide.
Installing the Liner
Once you have dug the hole, you need to install the liner. This should be done carefully to ensure that it is securely attached to the sides of the hole. Make sure all joints are sealed with waterproof tape.
Filling the Dry Well with Gravel
Next, you need to fill the hole with gravel. This will help to filter and absorb the water and prevent it from causing damage to the surrounding area. Make sure the gravel is evenly distributed throughout the hole.
Connecting the Drainage Pipes
Once the hole has been filled with gravel, you need to connect the drainage pipes. This will allow water to enter the dry well from other areas of your property. Connect the pipes to the dry well using a flexible connector, making sure to seal any joints with waterproof tape.
Capping the Dry Well
Finally, you need to cap the dry well. This can be done with a piece of metal or a heavy stone. Make sure the cap is firmly secured in place so that water doesn’t escape. Once the installation is complete, you can begin to enjoy the benefits of having a dry well.
DIY: Installing a Dry Well to Control Excess Water
Installing a dry well is a great way to control excess water in your yard or garden. With the right supplies and some basic DIY skills, you can build your own dry well in a few hours. Here’s how:
Gathering Necessary Supplies
The first step is to gather the necessary supplies. You will need a waterproof liner, gravel, and a pipe system. There are several types of liners available, including plastic sheeting, concrete, and pre-formed liners. You also need to choose the right type of gravel; coarse gravel, such as pea gravel, is best for this purpose.
Preparing the Site
Once you have the necessary materials, you need to prepare the site. Clear away any vegetation and level the ground. You may need to use a shovel or rake to do this. It’s important to make sure the area is flat so that the water will flow away from your property.
Excavating the Hole
Next, you need to excavate the hole for the dry well. The size and depth of the hole will depend on the amount of water you need to drain away and the type of soil in the area. Typically, you should dig the hole two to three feet deep and two to four feet wide.
Setting the Liner
Once the hole has been dug, you need to set the liner. This should be done carefully to ensure that it is securely attached to the sides of the hole. Make sure all joints are sealed with waterproof tape.
Adding Gravel to the Dry Well
The next step is to add gravel to the dry well. This will help to filter and absorb the water and prevent it from causing damage to the surrounding area. Use coarse gravel, such as pea gravel, and make sure you fill the hole evenly.
Connecting the Drainage Pipes
Once the hole has been filled with gravel, you need to connect the drainage pipes. This will allow water to enter the dry well from other areas of your property. Connect the pipes to the dry well using a flexible connector, making sure to seal any joints with waterproof tape.
Sealing the Dry Well
Finally, you need to seal the dry well. This can be done with a piece of metal or a heavy stone. Make sure the cap is firmly secured in place so that water doesn’t escape. Once the installation is complete, you can begin to enjoy the benefits of having a dry well.

A Comprehensive Guide to Installing a Dry Well
Installing a dry well can be a tricky task, but with the right knowledge and tools, it’s possible to do it yourself. Here’s a comprehensive guide to installing a dry well:
Defining the Problem
The first step is to identify the problem that you are trying to solve. Is there too much water in your yard or garden? Is it causing damage to your property? Do you need to drain away excess water? Answering these questions will help you determine the size and location of the dry well you need to install.
Selecting the Proper Materials
Once you have identified the problem, you need to select the proper materials for your dry well. You will need a waterproof liner, gravel, and a pipe system. There are several types of liners available, including plastic sheeting, concrete, and pre-formed liners. You also need to choose the right type of gravel; coarse gravel, such as pea gravel, is best for this purpose.
Planning the Location of the Dry Well
Once you have the necessary materials, you need to plan the location of the dry well. It should be located in an area of your yard or garden that is away from any buildings and slopes away from your house. This will ensure that the water flows away from your property and not towards it.
Measuring the Size of the Hole
You also need to measure the size of the hole you need to dig for the dry well. This will depend on the amount of water you need to drain away and the type of soil in the area. Generally, you should dig the hole two to three feet deep and two to four feet wide.
Installing the Liner
Once you have dug the hole, you need to install the liner. This should be done carefully to ensure that it is securely attached to the sides of the hole. Make sure all joints are sealed with waterproof tape.
Filling the Hole with Gravel
Next, you need to fill the hole with gravel. This will help to filter and absorb the water and prevent it from causing damage to the surrounding area. Make sure the gravel is evenly distributed throughout the hole.
Connecting the Drainage Pipes
Once the hole has been filled with gravel, you need to connect the drainage pipes. This will allow water to enter the dry well from other areas of your property. Connect the pipes to the dry well using a flexible connector, making sure to seal any joints with waterproof tape.
Capping the Dry Well
Finally, you need to cap the dry well. This can be done with a piece of metal or a heavy stone. Make sure the cap is firmly secured in place so that water doesn’t escape. Once the installation is complete, you can begin to enjoy the benefits of having a dry well.

All You Need to Know About Installing a Dry Well
Installing a dry well is a great way to manage excess water in your yard or garden. With the right supplies and some basic DIY skills, you can build your own dry well in a few hours. Here’s all you need to know about installing a dry well:
Understanding the Basics
The first step is to understand the basics of a dry well. A dry well is a simple structure that is used to collect and disperse excess water from a property. It is typically composed of a hole that is filled with gravel and lined with a waterproof material such as plastic. A pipe is installed in the bottom of the hole to allow water to flow into the dry well and then be dispersed away from the property.
Choosing the Right Location
Once you understand the basics, you need to choose the right location for your dry well. It should be located in an area of your yard or garden that is away from any buildings and slopes away from your house. This will ensure that the water flows away from your property and not towards it.
Estimating the Size of the Hole
You also need to estimate the size of the hole you need to dig for the dry well. This will depend on the amount of water you need to drain away and the type of soil in the area. Generally, you should dig the hole two to three feet deep and two to four feet wide.
Setting the Liner
Once the hole has been dug, you need to set the liner.
(Note: Is this article not meeting your expectations? Do you have knowledge or insights to share? Unlock new opportunities and expand your reach by joining our authors team. Click Registration to join us and share your expertise with our readers.)