Introduction
Cardboard robots are fun, creative projects that can be made with basic materials you likely already have in your home. Whether you’re looking for a fun weekend activity or an educational project for the kids, creating a cardboard robot is a great way to spend time together while learning new skills. From beginning to end, making your own cardboard robot is a rewarding process that will have you amazed at what you can create.
What is a Cardboard Robot?
A cardboard robot is a 3D model made of cardboard pieces that can be assembled into various shapes and sizes. It is a type of craft project that can be used for a variety of purposes, including teaching children about robotics, providing a creative outlet for adults, or simply as a fun way to pass the time. The possibilities are endless when it comes to designing your own cardboard robot – you can let your imagination run wild and create something unique and personalized.
Benefits of Creating a Cardboard Robot
Making a cardboard robot has many benefits, both educational and recreational. It encourages creativity, problem-solving, and critical thinking. According to a study published in the Journal of Technology Education, “The act of constructing a robot requires an understanding of several components, including the design process, tools, materials, and techniques. This understanding can only be gained through hands-on activities.” Additionally, creating a cardboard robot provides a sense of accomplishment and pride once the project is complete.
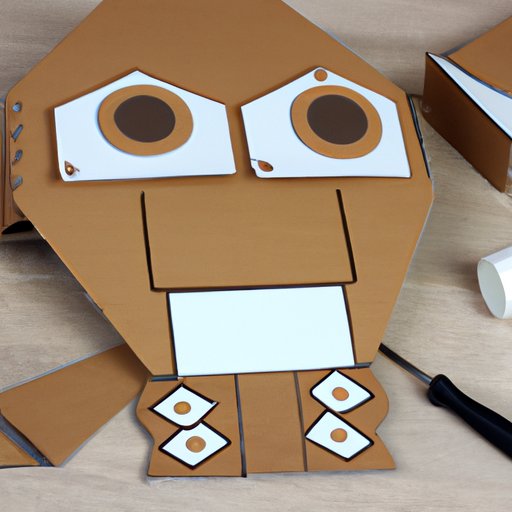
Step-by-Step Instructions for Creating a Cardboard Robot
Creating a cardboard robot is a relatively easy process that can be completed in just a few steps. Here is a guide to get you started:
Gather Tools and Materials
Before you start building your robot, gather all the necessary supplies. You will need a pair of scissors, a ruler, a pencil, glue, tape, and cardboard. If desired, you can also use markers, paint, or other decorative items to customize your robot.
Cut Out Cardboard Pieces
Use the ruler and pencil to draw out the pieces of your robot on the cardboard. Once the pieces are drawn, cut them out using the scissors. Make sure the pieces are neat and even, as they will be the foundation of your robot.
Assemble the Parts
Once the pieces are cut out, begin assembling them. Use the glue and tape to secure the parts together. Be sure to use enough glue so the pieces stay together securely. Allow the glue to dry before continuing.
Paint or Decorate the Robot
You can now add any details to your robot. Paint the pieces different colors, add eyes or buttons, or use markers to draw patterns or designs. Let your creativity shine and make your robot one-of-a-kind!
Showcase of Creative Cardboard Robots Made by Others
If you’re feeling stuck for ideas or just need some inspiration, check out these amazing cardboard robots crafted by others. From simple designs to complex creations, there are plenty of ideas to get your creative juices flowing.
Examples of Unique Designs
One example of an impressive cardboard robot is this life-sized replica of an Iron Man suit created by a father and son team. They used over 2,000 cardboard pieces to construct the suit and added details like glowing eyes, light-up arc reactors, and working servos. Another example is this robot made of recycled cardboard boxes, which features intricate details such as a spinning head and movable arms. These examples show that with a bit of creativity and dedication, anything is possible when it comes to cardboard robots.
Inspiration for Future Projects
These creative cardboard robots provide plenty of ideas for your next project. Whether you want to recreate a favorite character from a movie or television show, or invent your own robotic creation, the possibilities are endless. With a bit of imagination and some elbow grease, you can make your own amazing cardboard robot.

Interview with an Expert on Crafting Cardboard Robots
To learn more about crafting cardboard robots, we interviewed Patrick McClure, a professional cardboard robot builder. Patrick has been building robots out of cardboard for over 10 years and has worked on projects for clients ranging from museums to schools. Here is what he had to say about his craft:
Advice from Experienced Craftsman
When asked what advice he would give someone who was just starting out in cardboard robot building, Patrick said, “My best advice is to start small and build gradually. Don’t try to tackle something too big right away. Start with something simple, like a two-piece robot, and then build up from there. Also, take your time and don’t rush. Rushing can lead to sloppy workmanship and mistakes.”
Tips for Successful Construction
Patrick also shared some tips for successful construction. He said, “Make sure to measure twice and cut once. Take your time and be precise with your measurements and cuts. Also, use good quality materials. Cheap cardboard won’t last long and won’t look as nice. Lastly, have fun! Making a cardboard robot should be enjoyable and rewarding, not stressful.”

DIY Video Tutorial for Making a Cardboard Robot
If you want to follow along with step-by-step instructions, check out this video tutorial for making a cardboard robot. This video demonstrates the entire process from start to finish, showing each step in detail. The video also provides helpful tips and tricks for getting the most out of your cardboard robot.
Step-by-Step Visual Guide
The video walks you through the entire process, from gathering the supplies to painting and decorating the robot. It includes detailed instructions for cutting out the pieces, assembling the parts, and adding any finishing touches. It also shows how to customize the robot with paint, markers, and other decorations.
Demonstration of Techniques
In addition to the step-by-step instructions, the video also demonstrates useful techniques for working with cardboard. It covers topics such as measuring accurately, cutting straight lines, and gluing the pieces together. This video is a great resource for anyone looking to learn the basics of cardboard robot construction.
List of Materials and Tools Needed to Make a Cardboard Robot
Here is a list of the supplies and tools needed to make a cardboard robot. Most of these items can be found around the house or purchased at a local store.
Basic Supplies
Scissors, ruler, pencil, glue, tape, cardboard.
Optional Extras
Markers, paint, decorative items, etc.

Tips for Customizing Your Cardboard Robot
Customizing your cardboard robot is a great way to make it unique and personal. Here are some ideas for customizing your robot:
Ideas for Special Features
Add special features to your robot such as blinking lights, spinning wheels, or moving arms. You can also add fun details like eyes, buttons, or stickers.
Methods for Personalization
Personalize your robot by painting it in your favorite colors or drawing patterns or designs on it. You can also write your name on it or add any other personal touches you can think of.

Ideas for Using Recycled Materials in the Construction of a Cardboard Robot
Using recycled materials is a great way to reduce waste and save money. Here are some ideas for incorporating recycled materials into your cardboard robot:
Sources for Reusable Materials
Look for recyclable materials such as cardboard boxes, plastic containers, paper, or fabric scraps. You can also use old newspapers, magazines, or other paper products.
Ways to Incorporate Repurposed Items
Use the recycled materials to make the body of the robot or to create details such as eyes or buttons. You can also use fabric scraps to make clothing for your robot or use old newspapers to make a cape. The possibilities are endless!
Conclusion
Making a cardboard robot is a fun and rewarding activity that can be enjoyed by people of all ages. With a few simple steps and the right supplies, you can create a unique and personalized robot. From gathering materials to painting and decorating, the process of creating a cardboard robot is both enjoyable and educational. So grab some cardboard and get started on your own amazing robot today!
Summary of Article
This article provided an overview of how to make a cardboard robot, including step-by-step instructions, ideas for customization, and inspiration from projects made by others. We also included an interview with an expert on crafting cardboard robots and a video tutorial for those who want to follow along with a visual guide. Finally, we discussed ways to incorporate recycled materials into the construction of your robot.
Final Thoughts
Creating a cardboard robot is a great way to explore your creativity and learn new skills.
(Note: Is this article not meeting your expectations? Do you have knowledge or insights to share? Unlock new opportunities and expand your reach by joining our authors team. Click Registration to join us and share your expertise with our readers.)