Introduction
A starter is an essential component of a vehicle’s engine, as it is responsible for starting the car by turning the crankshaft. When the starter malfunctions, it can lead to a variety of issues such as difficulty starting the car or the engine not turning over at all. Knowing how to check if the starter is bad is essential for any driver who wants to ensure their vehicle is running properly.

Checking for a Clicking Sound
One of the most common signs of a bad starter is a clicking sound when you try to start the car. This is usually caused by a lack of power reaching the starter, which can be due to a weak or dead battery, corroded terminals, or faulty wiring. To check for this, turn the key in the ignition and listen for a single click. If you hear multiple clicks, then it is likely that the starter is to blame.
Steps to Test for a Clicking Sound
- Turn the key in the ignition and listen for a single click.
- If you hear multiple clicks, it is likely that the starter is bad.

Inspecting the Battery and Its Connections
Another potential cause of a bad starter is corrosion or damage to the battery or its connections. Corrosion can prevent the battery from providing enough power to start the car, while damaged wires can prevent the current from flowing freely. To check for these issues, inspect the battery and its connections for any visible signs of corrosion or damage.
Steps to Inspect the Battery and Its Connections
- Visually inspect the battery and its connections for signs of corrosion or damage.
- Look for any cracked, frayed, or discolored wires.
- Clean off any corrosion with baking soda and water.
- Tighten any loose connections.
Listening for a Grinding Noise
If the starter motor is worn out or has failed, you may hear a grinding noise when trying to start the car. This is usually caused by the gears inside the starter failing to engage, preventing the engine from turning over. To check for this, turn the key in the ignition and listen for a grinding noise.
Steps to Test for a Grinding Noise
- Turn the key in the ignition and listen for a grinding noise.
- If you hear a grinding noise, it is likely that the starter motor is worn out or has failed.

Checking for Proper Voltage at the Starter Solenoid
The starter solenoid is responsible for sending power from the battery to the starter motor. If the voltage at the solenoid is too low, it can prevent the starter from engaging. To check for this, use a multimeter to measure the voltage at the solenoid.
Steps to Check the Voltage
- Connect the black lead of a multimeter to the negative terminal of the battery.
- Connect the red lead of the multimeter to the positive terminal of the starter solenoid.
- Turn the ignition switch to the “on” position.
- Check the reading on the multimeter. It should be between 9 and 12 volts.
- If the reading is lower than 9 volts, it indicates that the solenoid is not receiving enough power.
Checking for a Burned Smell
A burned smell coming from the engine compartment is another sign that the starter is bad. This is usually caused by a short circuit in the starter, which can lead to the wires overheating and melting. To check for this, open the hood of the car and take a sniff.
Steps to Test for a Burned Smell
- Open the hood of the car and take a sniff.
- If you smell something burning, it could indicate that the starter has a short circuit.
Testing the Starter with a Voltmeter
Using a voltmeter is a more accurate way to test the starter for a short circuit. To do this, connect one lead of the voltmeter to the positive terminal of the starter and the other lead to the negative terminal. If the voltage reading is higher than 12 volts, then it is likely that there is a short circuit in the starter.
Steps to Test the Starter with a Voltmeter
- Connect one lead of the voltmeter to the positive terminal of the starter.
- Connect the other lead of the voltmeter to the negative terminal of the starter.
- Read the voltage reading on the voltmeter.
- If the voltage reading is higher than 12 volts, it likely indicates a short circuit in the starter.

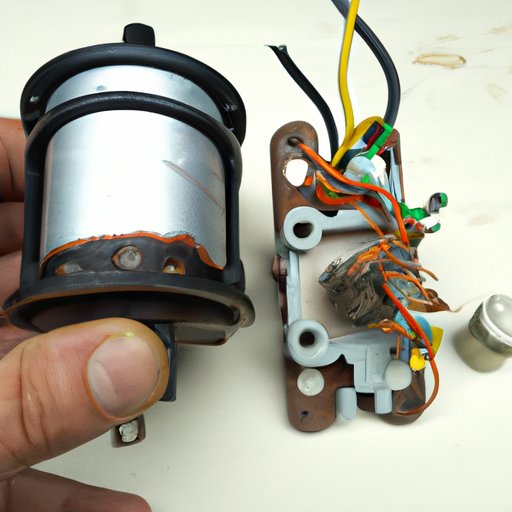
Removing the Starter to Inspect for Damage
If all of the above tests point to a bad starter, then you will need to remove the starter to inspect it for damage. This involves disconnecting the battery and removing the starter from the engine. Once you have removed the starter, inspect it for any visible signs of damage such as cracks, broken wires, or burnt-out coils.
Steps to Remove the Starter
- Disconnect the battery.
- Remove the starter from the engine.
- Inspect the starter for any visible signs of damage.
- Check for any cracks, broken wires, or burnt-out coils.
Conclusion
Knowing how to check if the starter is bad is essential for any driver who wants to ensure their vehicle is running properly. In this article, we discussed how to check for a clicking sound, inspect the battery and its connections, listen for a grinding noise, measure voltage at the starter solenoid, detect a burned smell, test the starter with a voltmeter, and remove the starter to inspect for damage.
(Note: Is this article not meeting your expectations? Do you have knowledge or insights to share? Unlock new opportunities and expand your reach by joining our authors team. Click Registration to join us and share your expertise with our readers.)