Introduction
A weed eater is a gardening tool used for trimming grass and weeds. It uses a flexible monofilament line that spins at high speed to cut through vegetation. The line needs to be replaced periodically due to wear and tear. Stringing a weed eater is a relatively simple process that can be completed in just a few minutes with the right tools and supplies.
Step-by-Step Tutorial for Stringing a Weed Eater
To string a weed eater, you will need a pair of safety glasses or goggles, a screwdriver, replacement line, and a pair of needle-nose pliers. Follow these steps for a successful stringing job:
Gather the Necessary Tools and Supplies
Before you begin, make sure you have all the necessary tools and supplies on hand. This includes safety glasses or goggles, a screwdriver, replacement line, and a pair of needle-nose pliers.
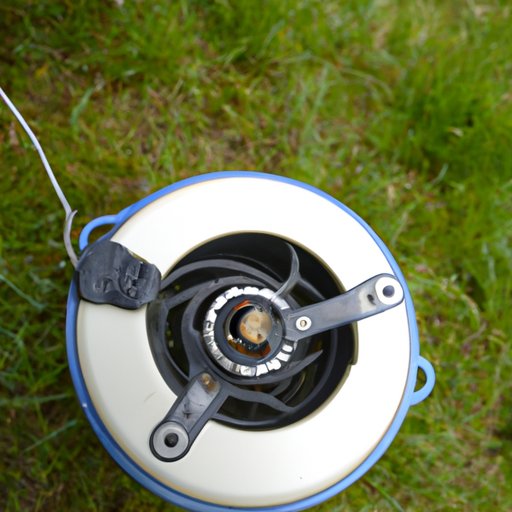
Prepare the Weed Eater for Stringing
Start by turning off the power to the weed eater and removing the spark plug wire. This will prevent accidental starting while you are working on the machine. Next, remove the head cover, which is typically secured by two or three screws. Once the cover is removed, you should see the spool of line inside.
Cut the Line to Size
Measure the length of the existing line and use this measurement as a guide for cutting the new line. Cut the line to the same length as the existing line. Make sure the ends of the line are even and free of any burrs or sharp edges.
Attach the Line to the Spool
Use the needle-nose pliers to thread one end of the line through the eyelet on the spool. Pull the line until there is about six inches of line extending beyond the eyelet. Hold the line in place with the pliers and wrap the excess line around the spool several times.
Wind the Line onto the Spool
Hold the spool firmly in place and turn it in a clockwise direction to wind the line onto the spool. Make sure the line is wound evenly and securely. If the line is not wound securely, it may come loose during use and cause damage to the weed eater.
Reattach the Spool to the Weed Eater
Once the line is securely wound onto the spool, reattach the head cover and secure it with the screws. Reconnect the spark plug wire and test the machine to make sure the line is winding properly. If the line does not wind properly, check the tension and adjust if needed.

How to Replace the Line on Your Weed Eater in 5 Easy Steps
Replacing the line on your weed eater is a relatively simple process that can be completed in five easy steps. Follow these steps for a successful stringing job:
Step One: Gather the Necessary Tools and Supplies
Before you begin, make sure you have all the necessary tools and supplies on hand. This includes safety glasses or goggles, a screwdriver, replacement line, and a pair of needle-nose pliers.
Step Two: Prepare the Weed Eater for Stringing
Start by turning off the power to the weed eater and removing the spark plug wire. This will prevent accidental starting while you are working on the machine. Next, remove the head cover, which is typically secured by two or three screws. Once the cover is removed, you should see the spool of line inside.
Step Three: Cut the Line to Size
Measure the length of the existing line and use this measurement as a guide for cutting the new line. Cut the line to the same length as the existing line. Make sure the ends of the line are even and free of any burrs or sharp edges.
Step Four: Attach the Line to the Spool
Use the needle-nose pliers to thread one end of the line through the eyelet on the spool. Pull the line until there is about six inches of line extending beyond the eyelet. Hold the line in place with the pliers and wrap the excess line around the spool several times.
Step Five: Wind the Line onto the Spool
Hold the spool firmly in place and turn it in a clockwise direction to wind the line onto the spool. Make sure the line is wound evenly and securely. If the line is not wound securely, it may come loose during use and cause damage to the weed eater.
A Beginner’s Guide to Stringing a Weed Eater
If you’ve never strung a weed eater before, it can seem like a daunting task. But with a little knowledge and patience, you can easily learn how to string a weed eater. Here is what you need to know before you begin:
What You Need to Know Before You Begin
Stringing a weed eater requires basic mechanical skills such as using a screwdriver and needle-nose pliers. You should also have a basic understanding of how the weed eater works and its various parts. Finally, you will need the proper tools and supplies such as safety glasses or goggles, replacement line, and a pair of needle-nose pliers.
Understanding the Parts of a Weed Eater
The most important part of a weed eater is the spool, which contains the line. The line is attached to the spool and winds around it when the weed eater is running. To replace the line, you will need to remove the head cover and spool, cut the new line to size, attach it to the spool, and then wind the line onto the spool.
Tips for Easier Stringing
When stringing your weed eater, always wear safety glasses or goggles to protect your eyes from flying debris. Make sure you use the right line for your particular weed eater. Always keep your work area clean to prevent dirt and debris from getting into the moving parts of the machine. Finally, be patient and take your time to ensure a successful stringing job.
How to Change the String on a Weed Eater
Changing the string on a weed eater is a relatively simple process. Here are the steps to follow for a successful stringing job:
Preparing the Weed Eater for Stringing
Start by turning off the power to the weed eater and removing the spark plug wire. This will prevent accidental starting while you are working on the machine. Next, remove the head cover, which is typically secured by two or three screws. Once the cover is removed, you should see the spool of line inside.
Removing the Old Line
Remove the old line from the spool by carefully pulling it out. Remove any remaining bits of line and debris from the spool and discard them.
Adding the New Line
Measure the length of the existing line and use this measurement as a guide for cutting the new line. Cut the line to the same length as the existing line. Use the needle-nose pliers to thread one end of the line through the eyelet on the spool. Pull the line until there is about six inches of line extending beyond the eyelet. Hold the line in place with the pliers and wrap the excess line around the spool several times.
Adjusting the Tension
Once the line is securely wound onto the spool, reattach the head cover and secure it with the screws. Reconnect the spark plug wire and test the machine to make sure the line is winding properly. If the line does not wind properly, check the tension and adjust if needed.

All You Need to Know About Replacing the Line on Your Weed Eater
Replacing the line on your weed eater is an essential part of regular maintenance. Here is what you need to know to ensure a successful stringing job:
Choosing the Right Line
Using the wrong type of line in your weed eater can cause damage to the machine. Be sure to choose a line that is specifically designed for your particular weed eater. Check the manufacturer’s instructions for more information.
Storing the Weed Eater Properly
Proper storage is key to keeping your weed eater in good working condition. Store the machine in a dry, dust-free environment to prevent dirt and debris from entering the moving parts. Also, make sure the line is wound tightly and securely on the spool.
Troubleshooting Common Issues
If you experience any problems while stringing your weed eater, consult the owner’s manual for troubleshooting tips. If the problem persists, contact the manufacturer or a qualified repair service for assistance.

Quick and Easy Tips for Stringing a Weed Eater
Stringing a weed eater is a relatively simple process that can be completed quickly and easily with the right tools and supplies. Here are some quick and easy tips for a successful stringing job:
Wear Safety Gear
Always wear safety glasses or goggles to protect your eyes from flying debris. Make sure you are wearing long pants and closed-toe shoes to protect yourself from the spinning line.
Use the Right Line
Using the wrong type of line in your weed eater can cause damage to the machine. Be sure to choose a line that is specifically designed for your particular weed eater.
Keep Your Work Area Clean
Keep your work area clean to prevent dirt and debris from getting into the moving parts of the machine. Wipe down the machine after each use to remove debris and buildup.
Have Patience
Be patient and take your time to ensure a successful stringing job. Don’t rush the process or try to force the line into place. Take your time and make sure everything is done correctly.
Conclusion
Stringing a weed eater is a relatively simple process that can be completed quickly and easily with the right tools and supplies. By following these step-by-step instructions and using the quick and easy tips provided, you can successfully string your weed eater and keep it in good working condition.
(Note: Is this article not meeting your expectations? Do you have knowledge or insights to share? Unlock new opportunities and expand your reach by joining our authors team. Click Registration to join us and share your expertise with our readers.)